Affiliate links may be included for your convenience. View our privacy and affiliates policy for details.
Learning how to knit ribbing is an important knitting skill because many knit garments use ribbing as an edging, and others use ribbing as an allover stitch pattern.
It’s a great category of stitch patterns because ribbing is sturdy, stretchy and doesn’t curl.
Knitting ribbing isn’t difficult to do, but there are some things to think about to make your ribbing even better.
What is Ribbing?
Ribbing is the term for knit stitches combined with purl stitches in a repeating pattern across the knit fabric that is also repeated on each row, making columns of alternating knits and purls across the fabric.
Rib stitches can be worked in a multitude of combinations that are often referred to by numbers. For example 1×1 ribbing would be a repeating pattern of knit 1, purl 1, while 3×3 rib is 3 knit stitches followed by 3 purl stitches.
Of course the number of knit and purl stitches doesn’t have to be the same; you can also make a ribbing that’s, say, 2 knits and 1 purl repeating.
Stitch Multiples for Ribbing
A key factor for making ribbing work is the stitch multiple. To make knit 1, purl 1 ribbing work so that every row is the same, you need to start with a knit stitch and end with a purl stitch. Therefore you need a multiple of 2 stitches.
Knitting 2×2 rib needs multiples of 4 stitches, 3×3 needs multiples of 6 stitches and so on.
If your pattern uses a ribbed edging and you need a stitch count that’s not the same multiple for the main part of the project, your pattern will have you increase or decrease after the ribbing to account for that.
Ribbing on Smaller Needles
When knitting a garment that starts (or ends) with ribbing, the pattern may suggest knitting the ribbing on a smaller needle than is used for the rest of the project.
That’s because rib stitches are stretchier than regular knitting like stockinette stitch, so working on smaller needles keeps the rib from stretching out wider than the rest of the garment.
In The Principles of Knitting, June Hemmons Hiatt says “you can hardly use a needle too small” for ribbing on garments:
“The more stitches there are packed into every inch of the fabric, the more elasticity it will have and the less likely it is that the ribbing will stretch out and lose its resilience with wear.”
Of course you can always work ribbing on a smaller needle even if the pattern doesn’t call for it.
How to Knit Ribbing

One thing that sometimes gives new knitters trouble as they learn how to knit ribbing is switching between knit stitches and purl stitches in the same row. Garter stitch and stockinette are made by working the same stitch across a full row, so knowing how to switch back and forth may be new to you.
The important thing to know is that knits and purls are worked the same way in ribbing as they are in any other stitch pattern, you just need to move the yarn back and forth — to the back for knit stitches and the front for purls.
As you’ll see, the yarn needs to go between the needles rather than around the needle, which would make a yarn over, adding a stitch and a hole to your project.
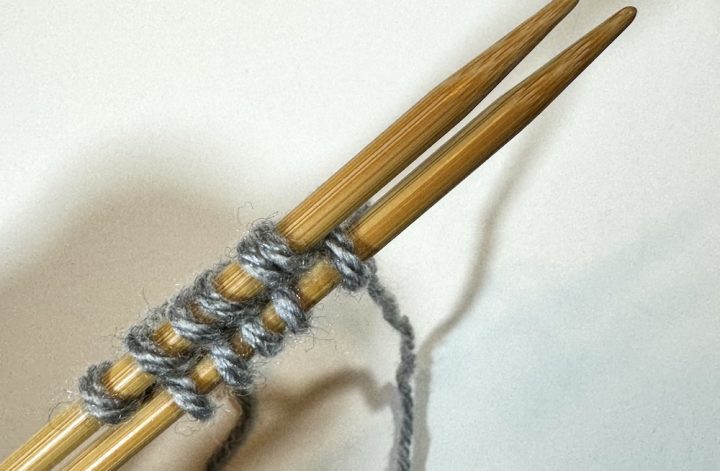
Casting on for Ribbing
You can of course use any cast on you like for projects that start with ribbing. In the sample swatches below I used long-tail cast on because that’s my favorite.
But casting on in ribbing gives your project a neat edge that all but disappears. There are various ways to do this, but this riff on a cable cast on is my favorite. I’m showing it here in 1×1 rib but you can make it for whatever rib stitch you’re using.

Begin with a slip knot. This counts as a knit stitch for purposes of the cast on, though I’ll remove mine later.

The next stitch is purl, so go into the slip knot from back to front with the yarn in front as if you were making a purl stitch.
Instead of finishing off the stitch as usual, slide the new stitch onto the left hand needle.

To cast on a knit stitch, take the needle between the two stitches on the needle from front to back with the yarn in back as if to make a knit stitch. This is the normal way you’d do a cable cast on.
Add this stitch to the left hand needle.
To cast on a purl stitch, take the needle between the last stitch you cast on and the one before it from back to front with the yarn in front as if to make a purl stitch. Make the stitch and add it to the left hand needle.

Continue to cast on, alternating knit and purl, for as many stitches as you need. I ended up with 13 counting the slip knot so I could end with a knit stitch, but you can end with a purl if you want. Just know your first stitch will be purl instead of knit as shown.
Knitting Ribbing

From here we’ll knit the first stitch as normal.

Then take the yarn from the back to the front between the needles.

Purl the next stitch as normal.

Take the yarn from the front to the back between the needles.

Knit the next stitch.
Continue to alternate knits and purls across the row.

Because I wanted my swatch to start with a knit and end with a purl, I unpicked the slip knot when I got to it, leaving me 12 stitches.
Increasing and Decreasing in Ribbing
That’s really all you need to know for a basic how to knit ribbing tutorial, but a lot of people have questions about increasing and decreasing in ribbing.
Any alteration of the stitch count alters the pattern, and working stitches between established knits and purls will mess up the columns of knits and purls you’ve established.

The only way I can think of to avoid that is to only add or subtract stitches at the beginning and end of the row and then just work those in whatever stitch makes sense to continue the pattern. For example if you cast on one stitch at each end, the new first stitch would be a purl and the last stitch would be a knit. Here for example I did a cable cast on of a purl at the front of the row and a wrap cast on at the end.
But it’s more common to increase or decrease within the row or round, so it’s important to pay attention to how the stitches fall after you increase or decrease.
Increasing Stitches
You can use any kind of increase you want when working ribbing, but I like to knit and purl into the same stitch. It’s sort of like a knit in the front and back (which is totally fine to do, too) but you do both in the front of the stitch.

First, knit the stitch as normal but don’t take it off the left hand needle.

Bring the yarn to the front between the needles and purl into the same stitch.

You can also work it as a purl in the front, knit in the front depending on what the original stitch was.

As you work back across this row, pay attention to whether the stitch looks like a knit or a purl on the needle and work it as you see it. Reminder: purls look like little bumps and knits are smooth.
If you’re working increases multiple times eventually you’ll get back to your regular pattern.
Decreasing Stitches

Your standard knit 2 together and slip, slip knit are great options for decreasing in ribbing. Again you’ll need to pay attention to how the decreases fall in relation to the other stitches.

I like to make sure the slip, slip knit starts with a knit stitch, as that will be the most prominent stitch in the decrease. I don’t care as much about the knit 2 together. Here I did ssk at the beginning of the row and k2tog at the end, two stitches in from either side.
Again remember to be mindful of what the stitches actually are instead of maintaining a strict ribbing pattern around the decreases.
Binding Off Ribbing
One more thing you might want to know when learning how to knit ribbing is how to bind off. Much like with casting on, you don’t have to do a special bind off for ribbing, but some people like to do what’s known as binding off in pattern.

Here we are still in knit 1, purl 1, so we start with a knit stitch.

Purl the next stitch.

Pull the first stitch over the second stitch and off the needle.
Repeat across, working each stitch as it has been in the previous rows.
This gives the bind off a similar amount of stretch to the knitting before it.
Generally I just use a standard bind off or a stretchy bind off and those work fine, too.
How to Knit Ribbing of Different Types
As I mentioned above, there are lots of different kinds of ribbing and they all look and act a little different in your project. Here’s a quick rundown of some of the basic ribbing patterns. All of these swatches are worked on 24 stitches.
1×1 Ribbing

1×1 ribbing is as basic as ribbing gets, and it’s what we’ve been looking at above.
Multiple: 2 stitches
Pattern: *Knit 1, purl 1. Repeat from * across
Properties: Looks most like stockinette stitch, lies flat, somewhat stretchy
2×2 Ribbing

Probably my favorite of the basic ribs is 2×2 ribbing. It’s quick and easy to knit, stretchy and looks good on projects, from the bottoms of sweaters to the brims of hats.
Multiple: 4 stitches
Pattern: *Knit 2, purl 2. Repeat from * across
Properties: Said to be the stretchiest of the rib stitches, looks neat and is easy to stitch
3×3 Ribbing

I also love 3×3 ribbing, but more for allover projects than for edges. (See, for example, my 3×3 ribbed scarf pattern.) It’s not as stretchy as the other ribs we’ve looked at, but I love how graphic it is.
Multiple: 6 stitches
Pattern: *Knit 3, purl 3. Repeat from * across
Properties: Dramatic, not very stretchy, good as an allover pattern
2×1 Ribbing

Of course ribbing doesn’t have to include the same number of knits and purls. You can work any combination you like and as you learn how to knit ribbing you might want to play with different combinations.
Multiple: 3 stitches
Pattern: Row 1: *Knit 2, purl 1. Repeat from * across. Row 2: *Knit 1, purl 2. Repeat from * across. Repeat these 2 rows for pattern
Properties: Looks similar to stockinette stitch but with more stretch, because of the uneven number of knits and purls it can curl some as seen above