Affiliate links may be included for your convenience. View our privacy and affiliates policy for details.
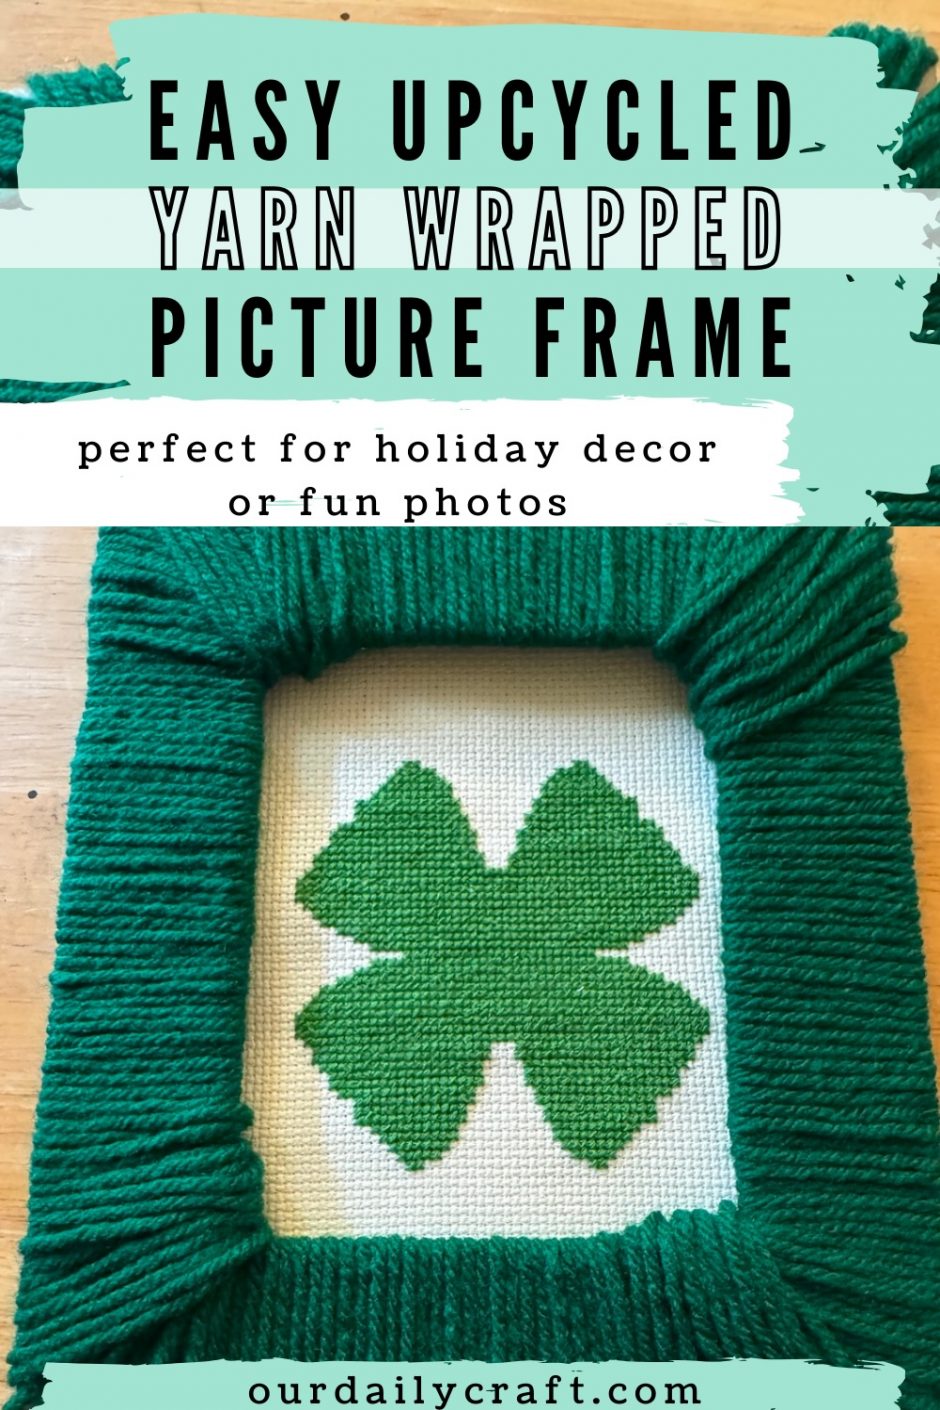
I wanted a little festive picture frame for my four leaf clover cross stitch pattern, so I made this easy upcycled yarn wrapped picture frame using paperboard.
It’s a pretty quick and easy DIY picture frame, and you could do this same thing with lots of different embellishments such as covering with scrapbook paper or collage instead of yarn.

Picture Frame Supplies
For my yarn wrapped picture frame I used a couple of pieces of paperboard. One was just from inside a package I’m not really sure where it came from and the other piece was part of a paperboard Priority Mail mailer. You can use a cereal box or heavier cardboard if you have it.
You’ll also need yarn or whatever you are covering the frame with. (I just used some green Red Heart Super Saver left in my stash from making pride flags)
A good pair of scissors (not good like fabric good, you know what I mean) and/or an X-acto knife is helpful for cutting the paperboard. You’ll also want some tape or glue to hold it all together. I used a bit of painter’s tape and some regular tape, but if I’d been able to find double sided tape in the house I would have used that.
How to Make a Yarn Wrapped Picture Frame

Before you can do the fun part of decorating your yarn wrapped picture frame, you’ll need to cut the paper board or cardboard to size. Since I knew I wanted my cross stitch piece to fit inside, I placed the cross stitch fabric on the paper board and marked out an inch/2.5 cm all around to be the outside of the frame.

Then I marked the actual size of the cross stitch fabric and came in a half an inch/1.25 cm all the way around so there would be overlap.

Once you’ve marked out your lines, use a cutting tool of your choice to cut out the center part of the paperboard to make your frame.

I accidentally cut a little too far on one side, so I used that notch as the place to start yarn wrapping. You’ll need a small ball of yarn that’s easy to manipulate through the frame as you wrap.

I started on a straight part, then to do the corners you just have to keep wrapping and overlapping until you’ve got them pretty well covered. Then you can work straight again.

If you need more yarn you can tie it to the end of the previous ball if it ends up on the back, or just tape the ends to the frame.

When you’ve wrapped all the way around, trim any extra yarn, then you can tuck the yarn end into the wraps, or tape or tie it down.

Finishing the Frame

Once you’ve decorated your DIY picture frame you need to put it all together. I cut another piece of paperboard the same size as the original frame and used painters tape to tape the cross stitch piece in place. Make sure the tape doesn’t show when you add the yarn wrapped picture frame on top.

Then I just looped a couple of pieces of regular tape onto the long sides of the back of the frame to tape the pieces together. I want this to be easily removable but if you don’t you can glue it or use stronger tape.
I’m happy just leaning my finished frame against the wall but you could also fashion a little stand for it out of more paperboard if you want it to stand on its own.

This kind of yarn wrapped picture frame is so fun for displaying little holiday decor pieces that won’t be on display for very long. For very little time and expense you can make a frame to match whatever holiday or season. Of course you could do this for photographs, artwork or anything else that needs a funky frame.