Affiliate links may be included for your convenience. View our privacy and affiliates policy for details.
I have long wanted to use this yarn in a project so I decided it was time to write a design your own vest knitting pattern.
This is a really easy place to start designing your own garments if that’s a thing you want to do, because the math is really easy. But you can use this same process to make anything you want, the math just gets more complicated as the garment does.
My Easy Vest Knitting Pattern

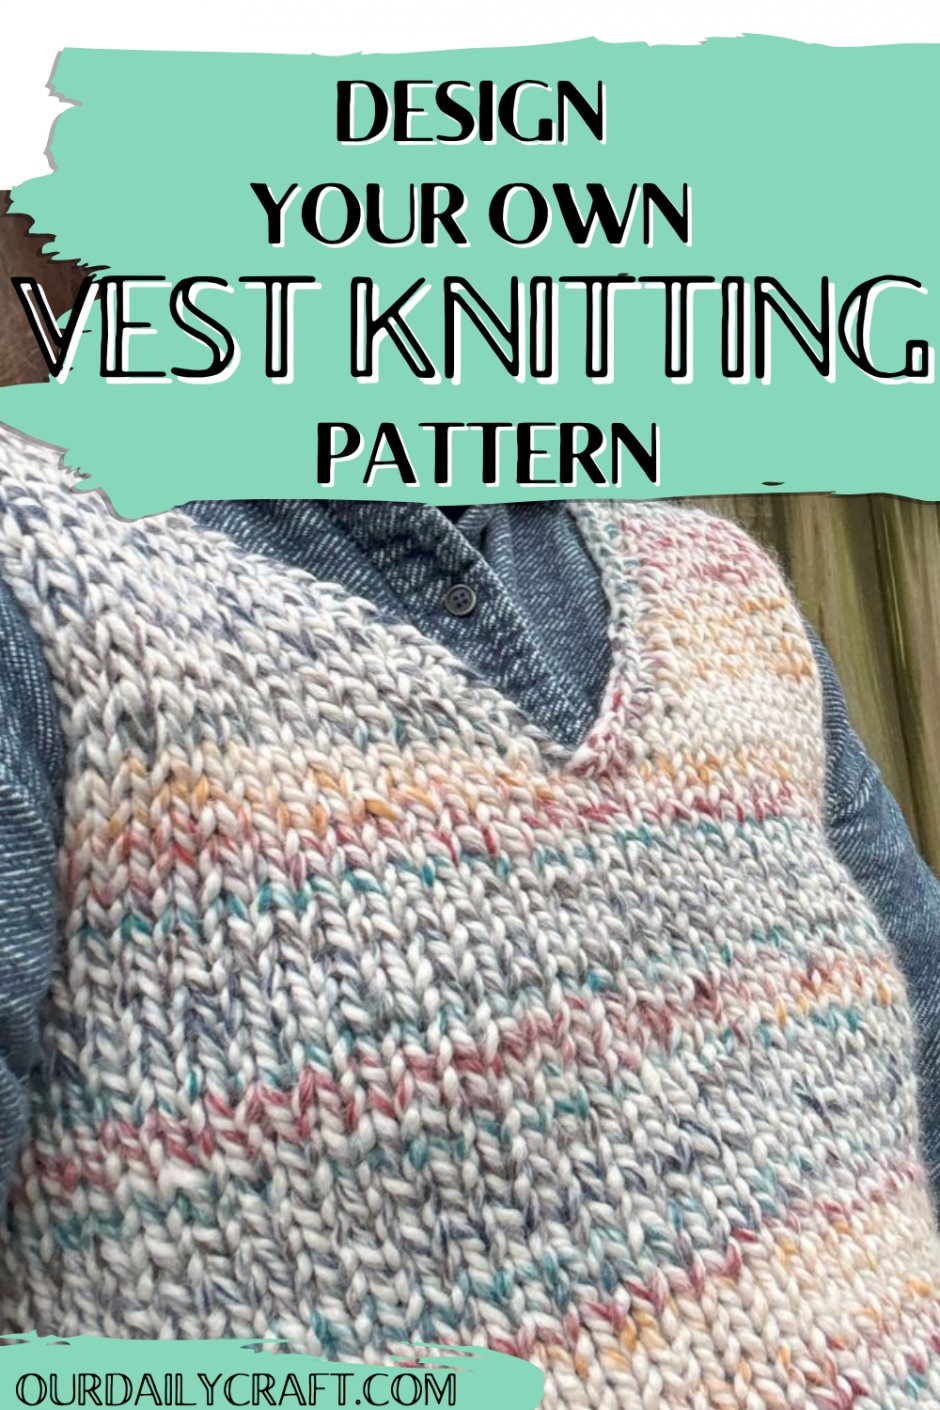
This all started with the yarn. I’ve wanted to make something out of Lion Brand’s Wool Ease Thick & Quick in the colorway Hudson Bay forever. On a recent trip to my local big box craft store they happened to have three balls, all of which were the same dye lot, so I decided it was time.
I will say I used almost every inch of the three skeins in my pattern, which is 36 inches/91.4 cm in the chest. If your vest is bigger, or you want it longer, or want to be able to do ribbing on the edges, you will need more yarn.
The yarn calls for size 13 US/9 mm knitting needles, so that’s what I used. Straight needles are fine for this project.
You’ll also need a sewing needle and, if you end up finishing the edges with crochet like I did, a 9 mm crochet hook.
Of course if you want to use different yarn (brand and/or weight) the process is exactly the same, just use the needle size recommended on your yarn ball.
Step One: Gauge

Since you will be designing your own knit vest pattern here, the first thing you need to do is knit and wash a gauge swatch.
This yarn has a suggested gauge of 9 stitches and 12 rows per 4 inches/10 cm. I like to make a bigger swatch than that, so I did 14 stitches. But it worked out that I was actually spot on for gauge, which almost never happens.
You don’t have to get the gauge the yarn calls for with a project like this, as long as you like the way the knit fabric looks.
If you want to use a stitch pattern other than stockinette on the body, make sure you swatch in that stitch pattern so you’ll get an accurate measurement.
Step Two: Sizing
The next step for your vest knitting pattern is to determine what size you want your vest to be. Because this is a super bulky yarn, I didn’t want it to fit too close to my body, so I went with a chest measurement a couple of inches bigger than my actual chest measurement.
You can decide if you want a vest that’s more like a tank top or an outer layer worn over other garments. Measure yourself if you don’t know your chest measurement, and add to that measurement as you like for the fit you want (this is called ease).
If you have a garment you like the fit of that you want to replicate, you can also measure it to determine how much ease you like.
Step Three: Math
Here comes the part where you actually write your design your own vest knitting pattern.
Because this vest is worked in two pieces, front and back, we start by dividing the desired chest measurement in half. For me that was 36 divided by 2, which is 18 inches/45.7 cm.
Using your gauge and your measurement, you can figure out how many stitches you need to cast on. In my case that was 9 divided by 4, or 2.25 stitches per inch/2.5 cm, multiplied by 18, which gives me 40.5 stitches.
You can’t cast on half a stitch, so you need to go up or down to a whole stitch. And because we’re starting with ribbing, an even number of stitches is good. I decided to go up to 42 stitches instead of down to 40, because you lose a little width for seaming, but it’s up to you which way you want to go.

Here’s the point where you decide what kind of ribbing you want and make sure the multiple of stitches you need matches the multiple you have. Adjust as necessary.
Now you can figure out how long you want your ribbing to be and whether you need to adjust your stitch count for any other stitch pattern you’re using (for stockinette you can keep the same count).
You’ll need to decide how long you want the body of your vest to be, how deep the armholes should be and what kind of neckline you want. Again you can use a garment you already have if you don’t know your preferences for body length and armhole depth.
Some people like to have the whole pattern written out before they start, but I’m more of a design on the needles kind of person, so I’ll walk you through all of that as we knit up my version.
My Design Your Own Vest Knitting Pattern
We’ll start by knitting the back because it’s super easy.
Cast on the number of stitches you need for your ribbing and knit to desired length of ribbing. Mine was 42 stitches and 2 inches/5 cm worth of ribbing.

Switch to stockinette stitch and work to desired length before the armholes. Mine is 12 inches/30.5 cm after the ribbing, or 14 inches/35.5 cm total.

On each of the next two rows, bind off an inch or two (2.5-5 cm) worth of stitches at the beginning of the row. I did 5 on mine, leaving 32 stitches.
Knit about half of the desired depth of the armhole, then shape the back of the neck. I bound off about a third of the stitches in the middle of the row, then worked each side separately to finish the back. I decreased one stitch on the neckline side every right side row until I had 6 stitches left on each side, then bound off the remaining stitches.
With my math that would be knit 11 stitches, bind off 10, knit remaining 11. Working just on this side, continue in stockinette stitch and decrease 1 stitch at the beginning of each right side/knit row until 6 stitches remain. Bind off. Join yarn to the remaining stitches such that you’ll purl the next row, then decrease 1 stitch at the end of each right side/knit row until 6 stitches remain. Bind off.
All of that can vary depending on your gauge and how wide you want the top part of the vest to be.
For the front, you work the same through the armholes. I wanted a V neck so I started my shaping for that about an inch/2.5 cm after the armhole bind offs.

Work across half the stitches, working a decrease at the neckline side. (Here I knit across 14 and did a knit 2 together, then turned and worked on just those stitches.)
Working each side separately, decrease one stitch on the neck end of each right side row until you have 6 stitches left on each side, then bind off the remaining stitches. I did knit 2 togethers on the right side of the vest and slip slip knits on the left to emphasize the v.
Make sure to keep an eye on your row count and decrease more or less frequently as needed to ensure your pieces end up the same length.
If you’d like to do a crew neck instead, you can shape as for the back, or bind off fewer stitches in the beginning and decrease on the sides for longer to make a deeper scoop.

Then you just sew the shoulder seams and the side seams and do any finishing on the neckline and armholes that you want. To make the seams less bulky and save yarn, I used a smooth worsted weight yarn to sew my seams.
I did a round of single crochet on the neckline and a round of slip stitches on the armholes and had about a yard of yarn left. How’s that for using every bit of yarn!