Affiliate links may be included for your convenience. View our privacy and affiliates policy for details.
This corner bookmark sewing pattern is great for a new sewist. It uses a tiny amount of fabric, has only straight lines to sew (and not many of them) and it will still function even if your lines are perfectly straight or your corners perfectly turned (spoiler alert: mine are neither and I’ve been sewing for years).
If you’re a reader of physical books or you know someone who is, this little project will up your/their reading game in no time. I’m making an effort to read more this year, and making these corner bookmarks just makes the experience a little nicer than, say, using an old bill or receipt.
What You’ll Need to Sew Corner Bookmarks

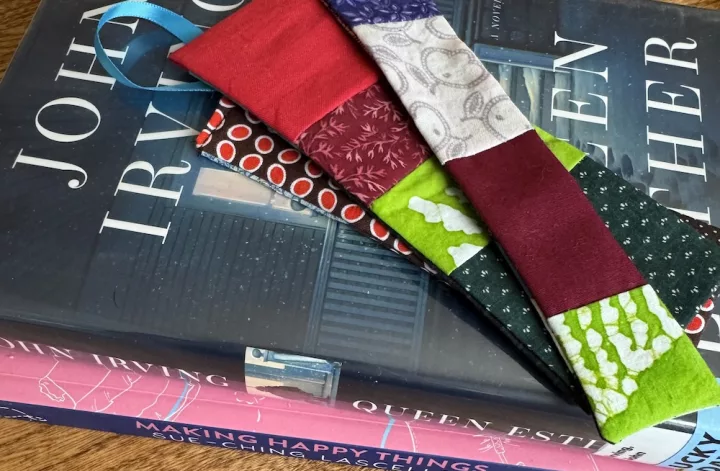
This corner bookmark sewing pattern comes in two sizes, but either way you need three squares of fabric. Generally two of them are cut from the same fabric and the third from a different one, but they could all match, all be different, you can make patchwork fabric to use, whatever you like.
Depending on the size you want for your bookmarks, these squares will either be 4 inches/10 cm or 3 inches/7.5 cm square. The 4-inch size seems pretty standard, but I feel like they are too big for some books. So I made two sizes.
If you like precision cutting you’ll want a cutting mat, quilting ruler and rotary cutter for this job, but you can also cut your squares by hand using good fabric scissors.
You’ll also need a sewing machine with thread (can match or clash with your fabric; I’m just using white), scissors for cutting threads, your iron and ironing board (I have a small ironing board in my sewing space, which I love) and something to help poke out your corners. Sewing clips or pins can also be helpful.
Corner Bookmark Sewing Pattern

If they aren’t cut already, cut your squares. This is a great batch sewing project if you want to make several at time for gifts or to stash around the house. Just cut all your fabric, press all your triangles, sew them, put the pieces together, sew, flip and finish. It’s almost as fast to make five as it is to make one!

Use your iron to press the square that will become the bookmark flap into a triangle shape with the right/printed side out.

Sew a seam along the long edge of the triangle. I try to use the edge of my presser foot to judge how wide the seam should be on these (that’s about 1/8th of an inch). Here I sewed two at the same time by stitching a couple of stitches on no fabric between them. Just cut them apart before proceeding.

Place one of your other squares down, front side up. Then put the triangle on top, with the right angle in a corner.

Put the other piece of fabric on top of the pile, front side down.

You can pin or clip these together if you like. I just clipped three sides to remind me not to sew all the way around.
I do like to sew all the corners on the machine, though, so I start on that fourth side an inch/2.5 cm or so from the corner.

Sew a straight seam until you’re close to the corner. Stop the machine and crank by hand until the needle is in the fabric. Life your presser foot and turn the fabric so you’re sewing down the next side. Repeat all the way around, leaving a gap of a couple of inches on the final side.

Trim the corners close to the seams, but make sure not to cut over the stitching.

Turn the bookmark inside out. Make sure you got all the edges sewn in, including the raw edges on the triangle part.

You can push the corners out with your fingers or use a tool. I’m using the end of a long pair of tweezers. My corners tend to be a little rounded but I don’t mind.

When you’ve got it looking the way you want, iron it, making sure the bits where you haven’t sewn the seam yet are tucked inside. You can clip or pin this too if you want.

Sew all around the outside of the bookmark (if you’re new to sewing this is called topstitching, and it helps hold everything in place.

Trim any remaining loose ends and enjoy! To use, just slide it over the page you are reading and close the book.

There are so many different ways to make this corner bookmark sewing pattern, with different fabrics and in different sizes, and they’re so quick to make you’ll probably find yourself with a collection of them in no time!